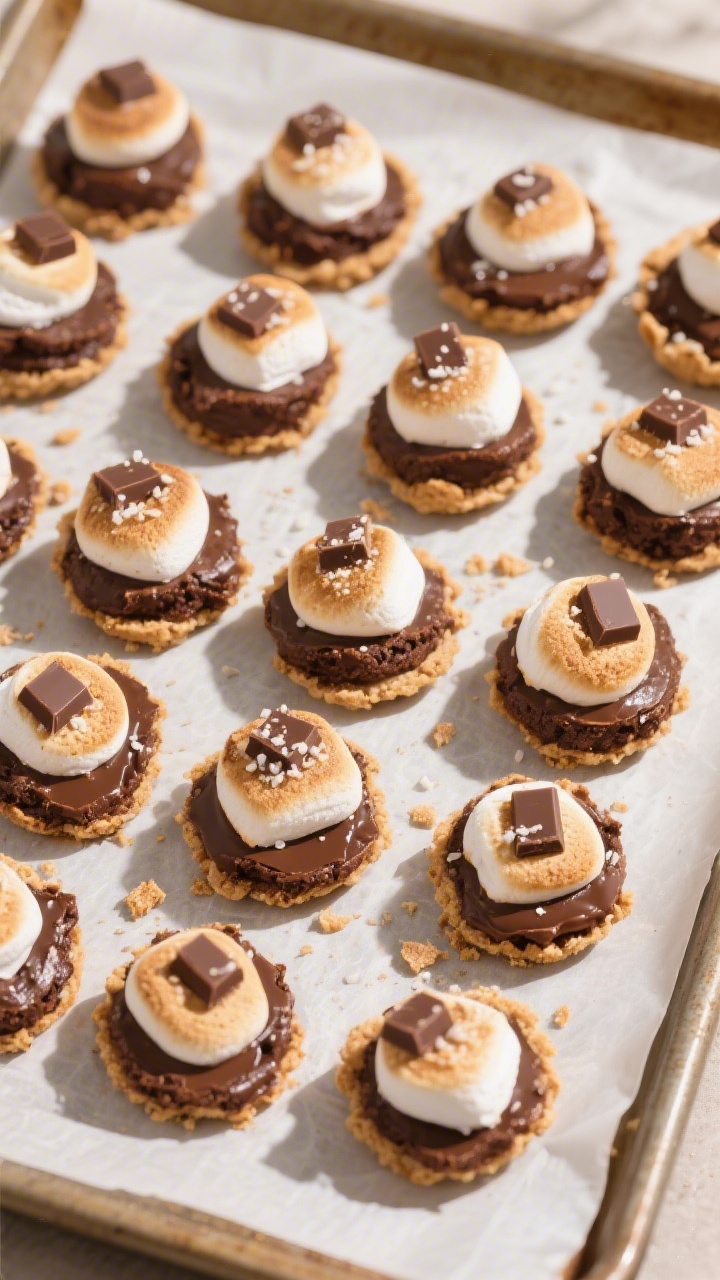
S’mores Brownie Bites – Gooey, Chocolatey, Bite-Sized Treats
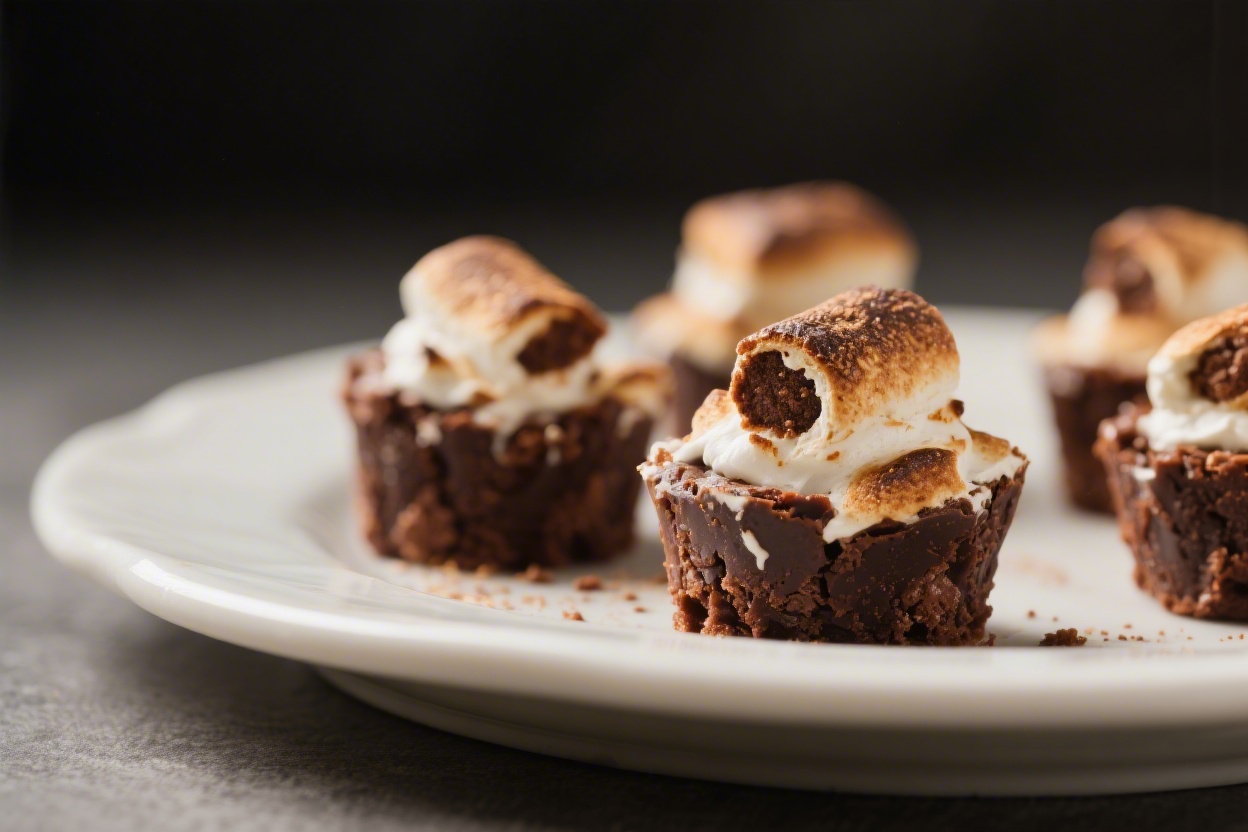
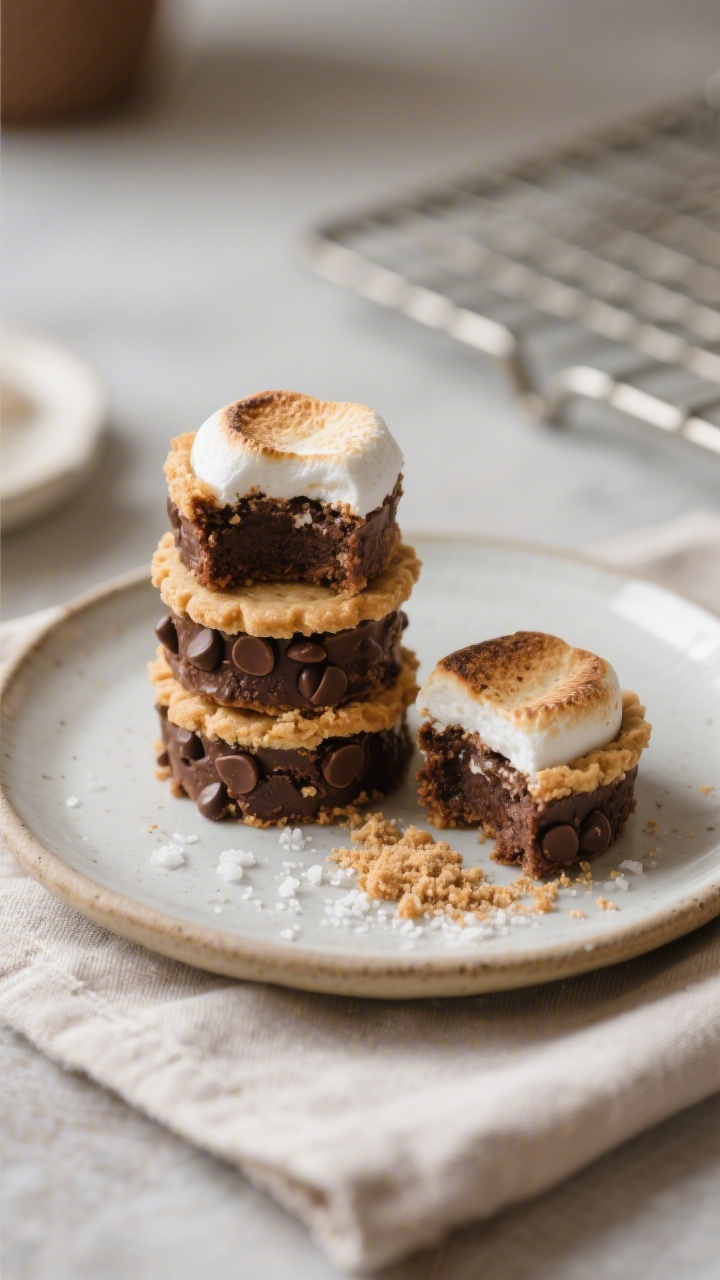
If you love s’mores and brownies, these S’mores Brownie Bites hit the sweet spot. They pack the flavor of a campfire favorite into a tidy, two-bite dessert. Expect a buttery graham crust, fudgy brownie center, and a toasted marshmallow top that gets delightfully gooey.
They’re easy to make, travel well, and disappear fast at parties. You don’t need a fire pit, just a muffin pan and a sweet tooth.
What Makes This Recipe So Good
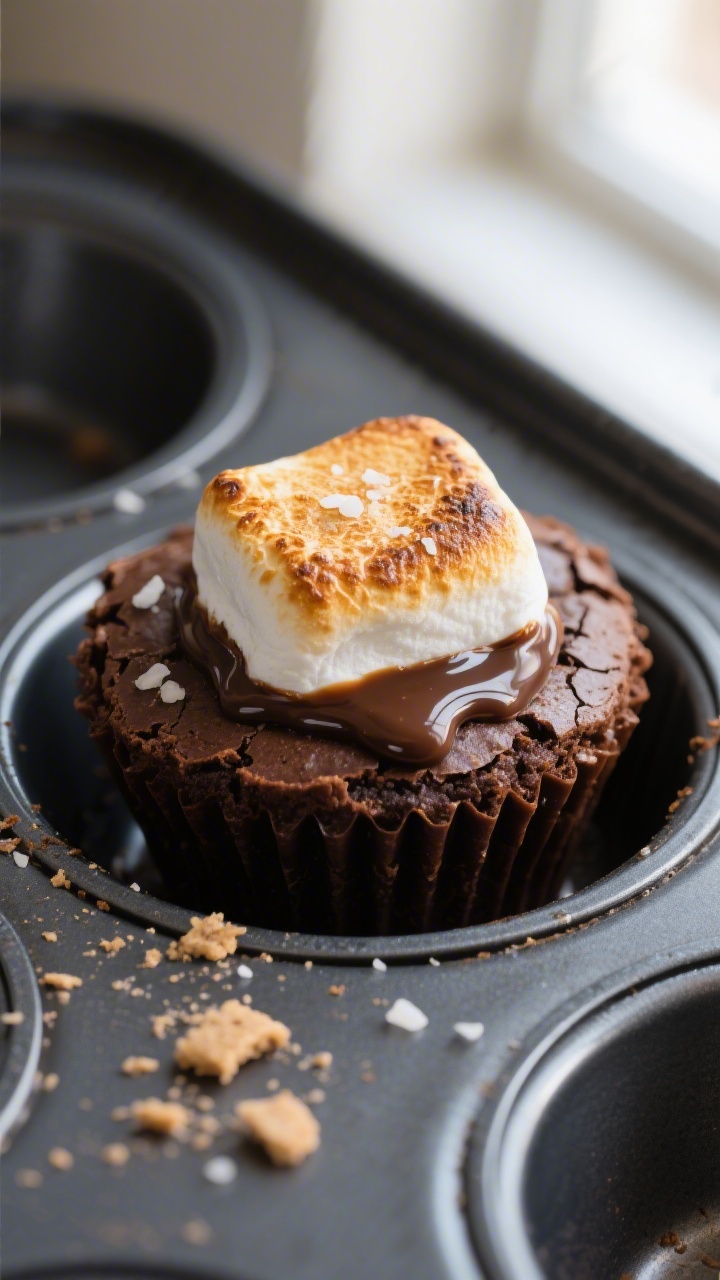
- Three layers of texture: Crunchy graham cracker base, dense brownie middle, and melty marshmallow top.
- Simple ingredients: Mostly pantry staples—no complicated steps or specialty tools.
- Perfectly portioned: Mini treats that are easy to serve, pack, and freeze.
- Kid- and crowd-friendly: Familiar flavors that please just about everyone.
- Flexible: Use homemade brownie batter or a high-quality box mix to save time.
Ingredients
- For the graham crust:
- 1 1/4 cups graham cracker crumbs
- 3 tablespoons granulated sugar
- 5 tablespoons unsalted butter, melted
- Pinch of salt
- For the brownie layer:
- 1/2 cup unsalted butter
- 3/4 cup granulated sugar
- 1/4 cup brown sugar, packed
- 2 large eggs, room temperature
- 1 teaspoon vanilla extract
- 1/2 cup all-purpose flour
- 1/3 cup unsweetened cocoa powder
- 1/4 teaspoon baking powder
- 1/4 teaspoon kosher salt
- 1/2 cup mini chocolate chips (optional but great)
- For the topping:
- 24–30 large marshmallows or about 2 cups mini marshmallows
- Extra graham crumbs and chocolate squares for garnish (optional)
- To finish:
- Flaky sea salt, a light sprinkle (optional but recommended)
How to Make It
- Prep the pan. Heat your oven to 350°F (175°C). Grease a mini muffin pan well or line with mini paper liners.
This recipe makes about 24–30 bites.
- Make the graham crust. Stir graham crumbs, sugar, melted butter, and a pinch of salt until the mixture looks like wet sand. Spoon about 1 teaspoon into each well. Press down firmly with the back of a spoon or a shot glass to create a compact base.
- Par-bake the crust. Bake for 5 minutes to set the crumbs.
Remove and let cool slightly while you mix the brownie batter.
- Melt the butter. In a small pot or microwave-safe bowl, melt the butter. Let it cool for 2–3 minutes so it doesn’t scramble the eggs.
- Mix the wet ingredients. Whisk in the granulated sugar and brown sugar until glossy. Add eggs and vanilla.
Whisk until the mixture lightens slightly, about 30 seconds.
- Add the dry ingredients. Sift or whisk together flour, cocoa, baking powder, and salt. Fold the dry mix into the wet ingredients just until combined. Stir in chocolate chips if using.
The batter will be thick.
- Fill the pan. Spoon about 1 tablespoon of brownie batter over each crust. Don’t overfill; you want them just shy of the top to make room for marshmallows later.
- Bake the brownies. Bake 10–12 minutes, until the tops look set and a toothpick has moist crumbs. Don’t bake fully dry; fudgy is the goal.
- Add marshmallows. Pull the pan from the oven.
Gently press one large marshmallow (cut in half crosswise) or a few minis onto each brownie. Return to the oven for 2–3 minutes, just until the marshmallows puff and soften.
- Toast the tops. For golden, toasty marshmallows, switch the oven to broil. Broil 20–40 seconds, watching closely.
Rotate the pan if needed. Pull them as soon as they’re evenly browned.
- Finish and cool. Sprinkle with a pinch of flaky salt and extra crumbs or a tiny chocolate piece if you like. Let the bites cool in the pan for 10–15 minutes, then loosen edges with a thin knife and transfer to a rack to cool fully.
- Serve. Enjoy slightly warm for maximum gooey factor, or at room temp for cleaner bites.
Storage Instructions
- Room temperature: Keep in an airtight container up to 2 days.
The marshmallows will soften but stay tasty.
- Refrigerator: Store up to 5 days. Let them sit at room temp 15–20 minutes before serving for best texture.
- Freezer: Freeze without the marshmallow topping for up to 2 months. Thaw, then add marshmallows and broil briefly to finish.
- Reheating: Warm a brownie bite in the microwave for 6–8 seconds to revive the gooey middle.
Why This is Good for You
- Built-in portion control: Mini sizes help keep servings reasonable without feeling deprived.
- Mood-boosting ingredients: Dark cocoa and a touch of chocolate chips add antioxidants and that classic chocolate comfort.
- Simple joy factor: A nostalgic treat can make celebrations feel special and reduce the urge to overdo it later.
- Flexible sweetness: You control the sugar and chocolate intensity, especially if you choose darker cocoa and limit add-ins.
What Not to Do
- Don’t skip greasing the pan. Marshmallows get sticky.
Liners or generous nonstick spray save your sanity.
- Don’t overbake the brownies. Dry centers lose the fudgy charm. Pull them when a toothpick shows moist crumbs.
- Don’t walk away during broiling. Marshmallows go from golden to charcoal in seconds.
- Don’t overfill the cups. Leave a bit of space so the marshmallows can sit on top without spilling over.
- Don’t press a warm pan with force. When releasing, wait for a slight cool-down. Forcing hot bites out can tear the crust.
Alternatives
- Gluten-free: Use certified gluten-free graham crumbs and swap in a 1:1 gluten-free flour blend for the brownie layer.
- Dairy-free: Use plant-based butter and dairy-free chocolate chips.
Check marshmallows for gelatin-free or vegan options if needed.
- Flavor twists: Add 1/2 teaspoon espresso powder to the batter for deeper chocolate flavor, or a pinch of cinnamon for warmth.
- Different crusts: Try chocolate wafer crumbs, Biscoff cookie crumbs, or crushed pretzels for a salty-sweet base.
- Bigger format: Use a regular muffin pan for jumbo bites. Increase bake time for the brownie layer by 2–4 minutes and watch closely.
- Box mix shortcut: Use your favorite brownie mix and prepare as directed, then follow the crust and marshmallow steps here.
FAQ
Can I make these ahead?
Yes. Bake the crust and brownie layers a day in advance.
Add and toast the marshmallows just before serving for the freshest look and texture.
How do I keep the marshmallows from sticking?
Grease the pan well, and let the bites cool before removing. A thin offset spatula or butter knife helps lift them out cleanly.
Do I have to use mini muffin pans?
No. A standard muffin pan works too.
You’ll get fewer, larger bites and need a slightly longer bake time for the brownie layer.
What cocoa powder should I use?
Use natural or Dutch-process cocoa. Dutch-process gives a smoother, darker flavor. Both work well in this recipe.
Can I add nuts?
Absolutely.
Fold in 1/3 cup chopped walnuts or pecans with the chocolate chips. Toast the nuts first for extra flavor.
Why did my marshmallows deflate?
They’ll naturally settle as they cool. If you want taller tops, use a whole large marshmallow instead of halves, or stack two minis after broiling and give them a quick, careful kiss under the broiler.
How do I get clean edges?
Chill the bites for 20 minutes after cooling to firm the marshmallow.
Then use a thin knife to release the sides and lift gently.
Can I use homemade marshmallows?
Yes. Cut them to fit the muffin wells and broil briefly. Homemade marshmallows melt a bit faster, so watch them closely.
What if I don’t have graham crackers?
Use crushed digestive biscuits, vanilla wafers, or Biscoff cookies.
Adjust the sugar slightly based on sweetness.
How can I reduce the sweetness?
Use bittersweet chocolate chips, Dutch-process cocoa, and reduce the granulated sugar in the brownie layer by 2 tablespoons. Add a light sprinkle of flaky salt on top to balance flavors.
In Conclusion
S’mores Brownie Bites bring the best parts of a campfire dessert into a neat, shareable package. They’re easy to make, irresistibly gooey, and flexible enough for different diets and schedules.
Keep a batch on hand for birthdays, bake sales, or weeknight cravings. One bite, and you’ll see why these little treats never last long.
Ingredients
Method
- Prep the pan. Heat your oven to 350°F (175°C). Grease a mini muffin pan well or line with mini paper liners. This recipe makes about 24–30 bites.
- Make the graham crust. Stir graham crumbs, sugar, melted butter, and a pinch of salt until the mixture looks like wet sand. Spoon about 1 teaspoon into each well. Press down firmly with the back of a spoon or a shot glass to create a compact base.
- Par-bake the crust. Bake for 5 minutes to set the crumbs. Remove and let cool slightly while you mix the brownie batter.
- Melt the butter. In a small pot or microwave-safe bowl, melt the butter. Let it cool for 2–3 minutes so it doesn’t scramble the eggs.
- Mix the wet ingredients. Whisk in the granulated sugar and brown sugar until glossy. Add eggs and vanilla. Whisk until the mixture lightens slightly, about 30 seconds.
- Add the dry ingredients. Sift or whisk together flour, cocoa, baking powder, and salt. Fold the dry mix into the wet ingredients just until combined. Stir in chocolate chips if using. The batter will be thick.
- Fill the pan. Spoon about 1 tablespoon of brownie batter over each crust. Don’t overfill; you want them just shy of the top to make room for marshmallows later.
- Bake the brownies. Bake 10–12 minutes, until the tops look set and a toothpick has moist crumbs. Don’t bake fully dry; fudgy is the goal.
- Add marshmallows. Pull the pan from the oven. Gently press one large marshmallow (cut in half crosswise) or a few minis onto each brownie. Return to the oven for 2–3 minutes, just until the marshmallows puff and soften.
- Toast the tops. For golden, toasty marshmallows, switch the oven to broil. Broil 20–40 seconds, watching closely. Rotate the pan if needed. Pull them as soon as they’re evenly browned.
- Finish and cool. Sprinkle with a pinch of flaky salt and extra crumbs or a tiny chocolate piece if you like. Let the bites cool in the pan for 10–15 minutes, then loosen edges with a thin knife and transfer to a rack to cool fully.
- Serve. Enjoy slightly warm for maximum gooey factor, or at room temp for cleaner bites.
Printable Recipe Card
Want just the essential recipe details without scrolling through the article? Get our printable recipe card with just the ingredients and instructions.

Sumayya is a home cook and recipe creator who shares simple, flavorful recipes made for everyday cooking. She believes good food should be easy, comforting, and enjoyed by everyone.