Peanut Butter Rice Krispie Treats – Easy, Chewy, and Packed With Flavor
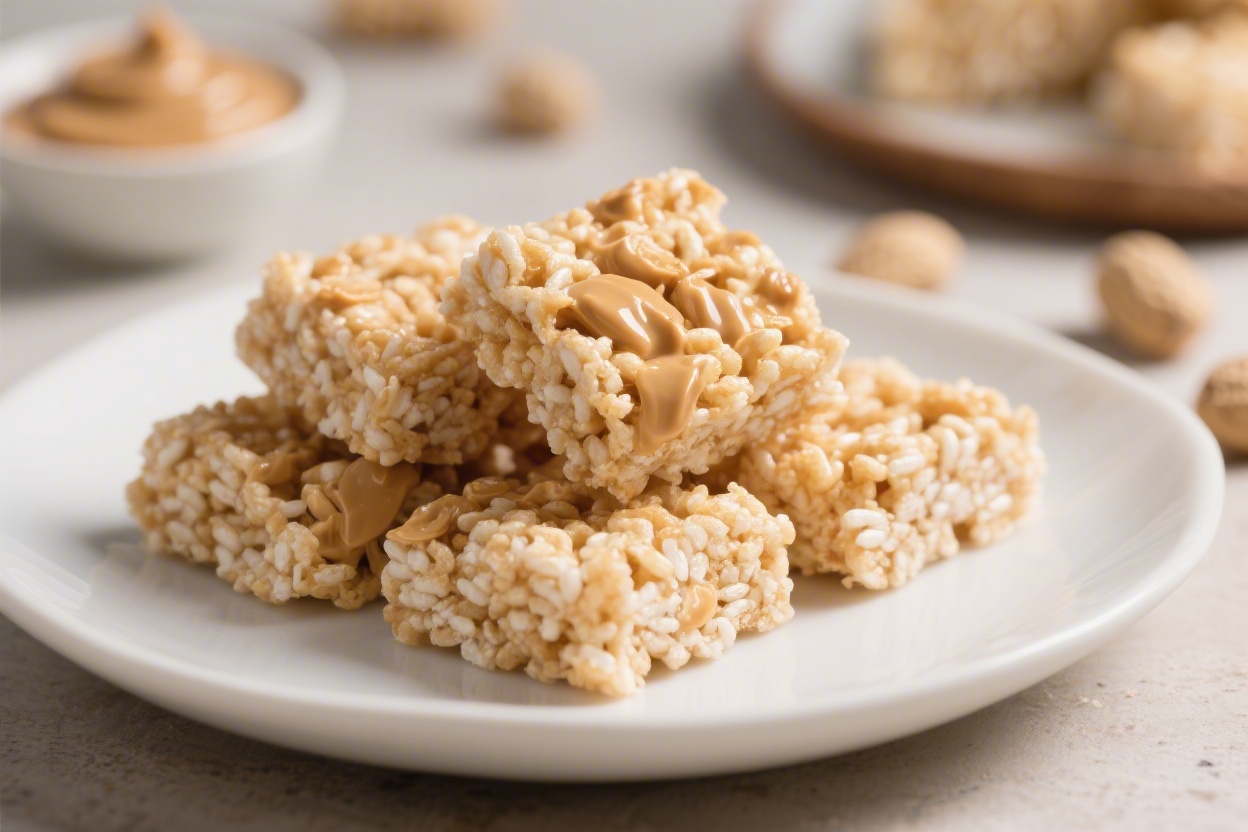
Peanut butter Rice Krispie treats are one of those simple, feel-good desserts that never disappoint. They’re quick to make, require just a handful of pantry staples, and hit that sweet spot between chewy and crispy. If you love classic Rice Krispie treats, the peanut butter twist takes them to the next level.
The best part? You don’t even have to turn on the oven. Just stir, press, and let them set.
What Makes This Recipe So Good
- Fast and fuss-free: You can make a full pan in about 15 minutes, start to finish.
- Perfect texture: Soft, chewy, and slightly sticky with a satisfying crunch in every bite.
- Balanced sweetness: Peanut butter adds richness and cuts the sweetness of the marshmallows.
- No baking required: This is a stovetop recipe with simple steps and easy cleanup.
- Great for sharing: Ideal for potlucks, bake sales, lunch boxes, or weeknight treats.
- Flexible: Easy to customize with chocolate, sea salt, or a hint of vanilla.
What You’ll Need
- 6 cups Rice Krispies cereal (or any crisped rice cereal)
- 10 ounces mini marshmallows (about 5 1/2 cups), plus a small extra handful for extra gooeyness, optional
- 1/2 cup creamy peanut butter (no-stir style works best)
- 4 tablespoons unsalted butter
- 1/4 teaspoon fine salt (skip if using salted butter)
- 1 teaspoon vanilla extract (optional, but adds great flavor)
- Nonstick spray or extra butter for greasing the pan
- Optional toppings: 1/2 cup chocolate chips, melted chocolate drizzle, flaky sea salt
Step-by-Step Instructions
- Prep your pan: Lightly grease a 9×13-inch baking dish with butter or nonstick spray.You can also line it with parchment for easier removal.
- Measure the cereal: Add the Rice Krispies to a large mixing bowl and set aside. This makes it easier and faster to combine when the marshmallow mixture is ready.
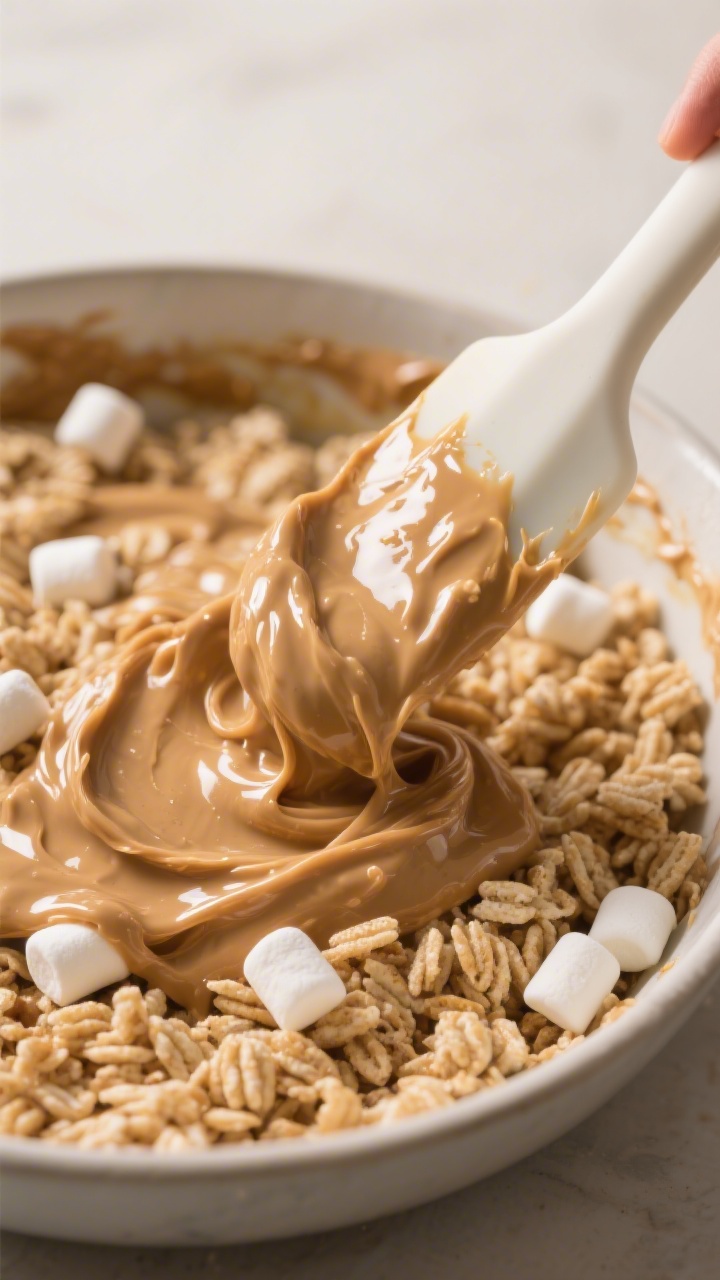
- Melt the butter: In a large pot over low heat, melt the butter completely. Keep the heat low to prevent scorching.
- Add peanut butter: Stir in the peanut butter until smooth and fully combined with the melted butter.
- Melt the marshmallows: Add the marshmallows and salt to the pot.Stir constantly over low heat until the marshmallows are fully melted and glossy. If using vanilla, stir it in now. For extra gooey treats, reserve a small handful of marshmallows to fold in later.
- Combine with cereal: Immediately pour the warm marshmallow mixture over the cereal.Use a spatula to gently fold until everything is evenly coated. If you reserved extra marshmallows, fold them in now for little pockets of gooeyness.
- Press into the pan: Transfer the mixture to the prepared pan. Lightly grease your hands or a piece of parchment and gently press the mixture into an even layer. Don’t pack too firmly—light pressure keeps the treats soft and chewy.
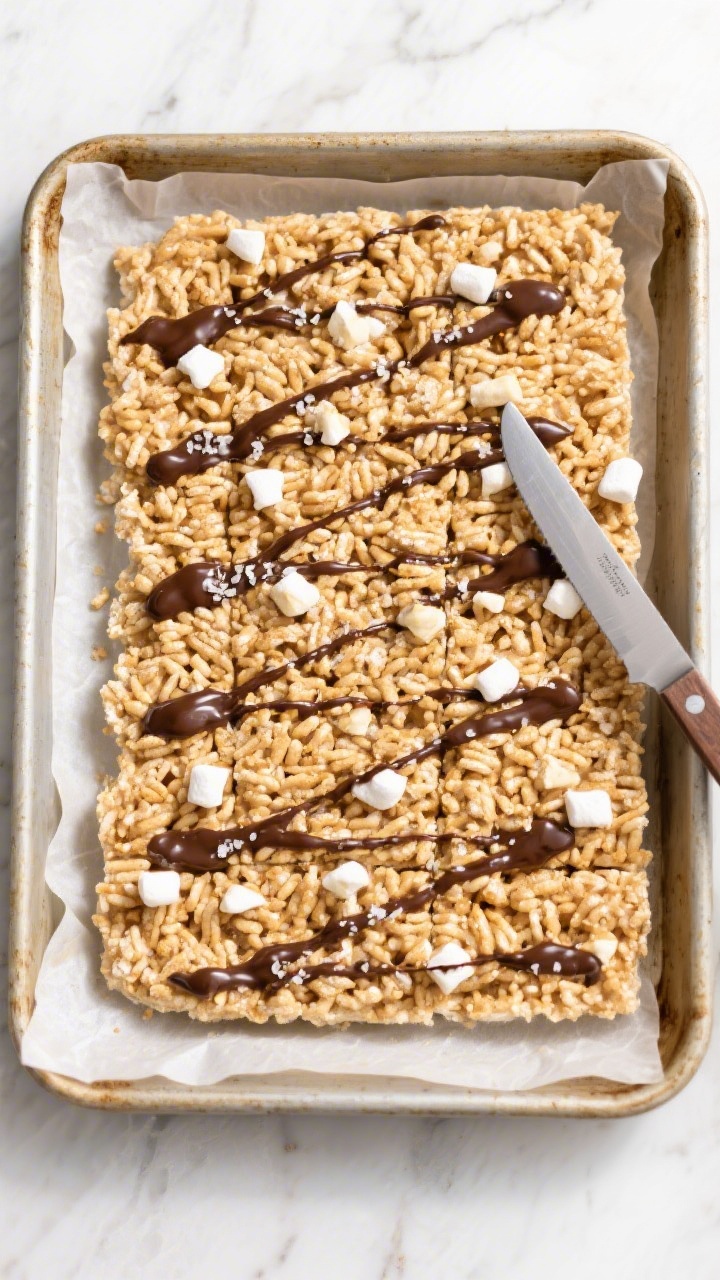
- Optional finish: Sprinkle chocolate chips on top while warm and let them soften, or drizzle melted chocolate over the cooled bars.A tiny pinch of flaky sea salt is great here too.
- Let set and slice: Allow the treats to cool at room temperature for 30–45 minutes. Cut into squares with a sharp knife. For the cleanest cuts, lightly grease the knife.
How to Store
- Room temperature: Store in an airtight container at room temp for up to 3 days.Layer with parchment to prevent sticking.
- Refrigerator: You can refrigerate for up to 5 days, but the texture gets a bit firmer. Let them sit out for 10–15 minutes before serving.
- Freezer: Wrap individual squares tightly in plastic, then place in a freezer bag. Freeze for up to 1 month.Thaw at room temperature before eating.
Why This is Good for You
- Peanut butter provides protein and healthy fats, which help make the treat more satisfying and keep you fuller a bit longer.
- Portion control is easy: Small squares deliver a sweet fix without going overboard.
- Simple ingredients: You control the sweetness and add-ins, and you can choose better-quality options if you like.
- No artificial dyes or heavy frostings, just classic flavors with a nutty boost.
What Not to Do
- Don’t crank the heat: High heat will scorch the butter or seize the marshmallows, making the mixture stiff and grainy.
- Don’t overpack the pan: Pressing too hard creates dense, tough bars.
- Don’t use natural peanut butter that separates unless it’s very well stirred. Excess oil can make the bars greasy and loose.
- Don’t wait too long to mix: The marshmallow mixture sets quickly. Have the cereal ready before you start melting.
- Don’t skip the salt: A small pinch balances sweetness and brightens the peanut flavor.
Variations You Can Try
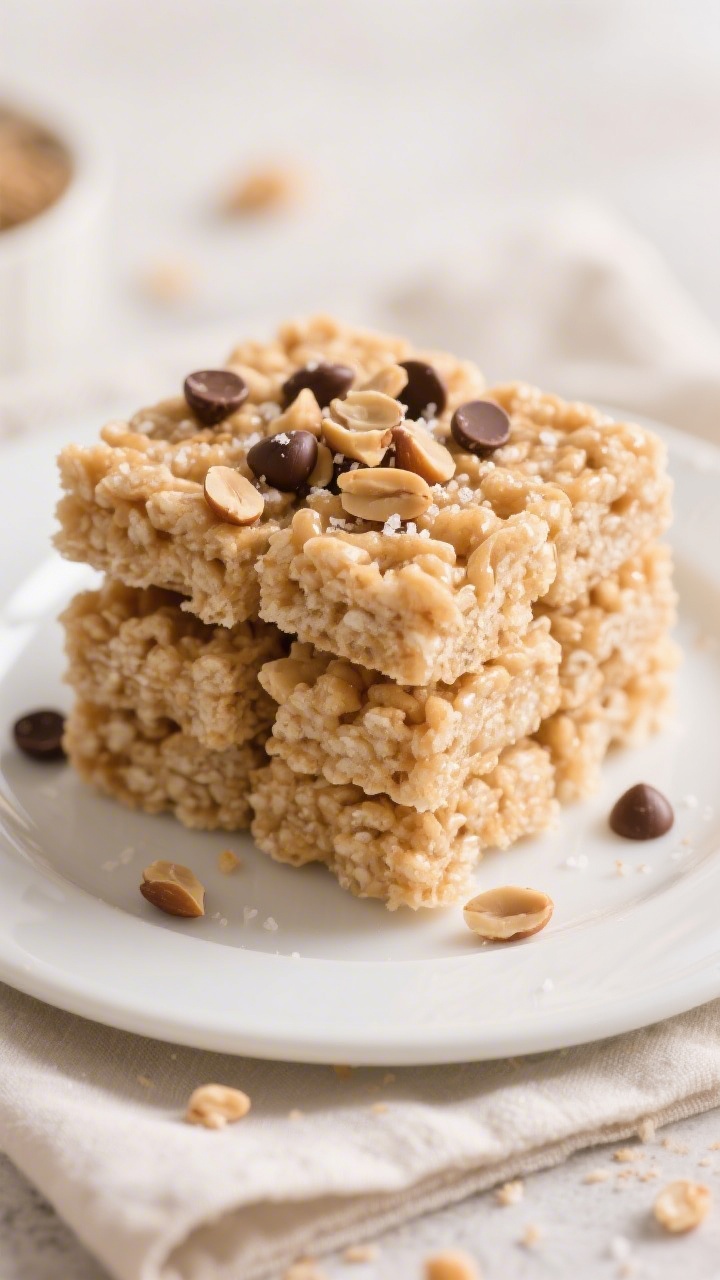
- Chocolate Peanut Butter: Stir in 1/2 cup mini chocolate chips after mixing, or drizzle melted chocolate on top.A peanut butter cup crumble is great too.
- Butterscotch Twist: Add 1/2 cup butterscotch chips to the warm mixture or sprinkle them on top to melt slightly.
- Sea Salt Crunch: Finish with flaky sea salt and a light drizzle of dark chocolate for a grown-up touch.
- Honey Peanut: Replace 2 tablespoons of the marshmallows with 2 tablespoons honey for a deeper, toasted sweetness.
- Almond or Cashew Swap: Use almond or cashew butter in place of peanut butter. Choose a no-stir version for best texture.
- Extra Gooey: Fold in an extra 1/2 cup mini marshmallows at the end for soft pockets throughout.
- Gluten-Free: Use certified gluten-free crisped rice cereal and marshmallows that are labeled gluten-free.
- Peanut Crunch: Sprinkle chopped roasted peanuts on top for extra texture and a salty bite.
FAQ
Can I use jumbo marshmallows instead of mini?
Yes. Use the same total weight (10 ounces).
Cut or tear them in half for faster melting, and stir constantly over low heat to prevent scorching.
What kind of peanut butter works best?
Creamy, no-stir peanut butter gives the most consistent texture. Natural peanut butter that separates can work if you mix it very well, but the bars may turn softer or slightly oily.
How do I keep the mixture from sticking to my hands?
Lightly butter your hands or press the mixture with a piece of greased parchment paper. A silicone spatula sprayed with nonstick spray also works well.
Why are my treats hard instead of chewy?
This usually happens from heating the marshmallows too hot or pressing the mixture too firmly into the pan.
Keep the heat low and use a gentle touch when pressing.
Can I make these dairy-free?
Yes. Use a dairy-free butter alternative and check that your marshmallows are dairy-free. Most are, but always read the label.
The texture will be very similar.
How can I make them less sweet?
Add an extra pinch of salt, use dark chocolate drizzle instead of milk chocolate, and consider adding 1/4 cup chopped roasted peanuts. The peanut butter also helps balance sweetness.
Do I need to refrigerate them?
No. Room temperature storage in an airtight container is best for a soft, chewy texture.
Refrigeration will firm them up, which some people like, but it’s not required.
Can I halve the recipe?
Absolutely. Use an 8×8-inch pan and half of each ingredient. Keep the same technique and watch the melting step closely.
Final Thoughts
Peanut butter Rice Krispie treats are the kind of simple dessert that feels both nostalgic and a little upgraded.
They come together fast, taste great, and always get a warm welcome at any gathering. With a few small tips—low heat, light pressure, and the right peanut butter—you’ll get soft, chewy bars every time. Keep this recipe in your back pocket for last-minute cravings, school events, or lazy weekend baking without the oven.
Ingredients
Method
- Prep your pan: Lightly grease a 9x13-inch baking dish with butter or nonstick spray. You can also line it with parchment for easier removal.
- Measure the cereal: Add the Rice Krispies to a large mixing bowl and set aside. This makes it easier and faster to combine when the marshmallow mixture is ready.
- Melt the butter: In a large pot over low heat, melt the butter completely. Keep the heat low to prevent scorching.
- Add peanut butter: Stir in the peanut butter until smooth and fully combined with the melted butter.
- Melt the marshmallows: Add the marshmallows and salt to the pot. Stir constantly over low heat until the marshmallows are fully melted and glossy. If using vanilla, stir it in now. For extra gooey treats, reserve a small handful of marshmallows to fold in later.
- Combine with cereal: Immediately pour the warm marshmallow mixture over the cereal. Use a spatula to gently fold until everything is evenly coated. If you reserved extra marshmallows, fold them in now for little pockets of gooeyness.
- Press into the pan: Transfer the mixture to the prepared pan. Lightly grease your hands or a piece of parchment and gently press the mixture into an even layer. Don’t pack too firmly—light pressure keeps the treats soft and chewy.
- Optional finish: Sprinkle chocolate chips on top while warm and let them soften, or drizzle melted chocolate over the cooled bars. A tiny pinch of flaky sea salt is great here too.
- Let set and slice: Allow the treats to cool at room temperature for 30–45 minutes. Cut into squares with a sharp knife. For the cleanest cuts, lightly grease the knife.
Printable Recipe Card
Want just the essential recipe details without scrolling through the article? Get our printable recipe card with just the ingredients and instructions.

Sumayya is a home cook and recipe creator who shares simple, flavorful recipes made for everyday cooking. She believes good food should be easy, comforting, and enjoyed by everyone.