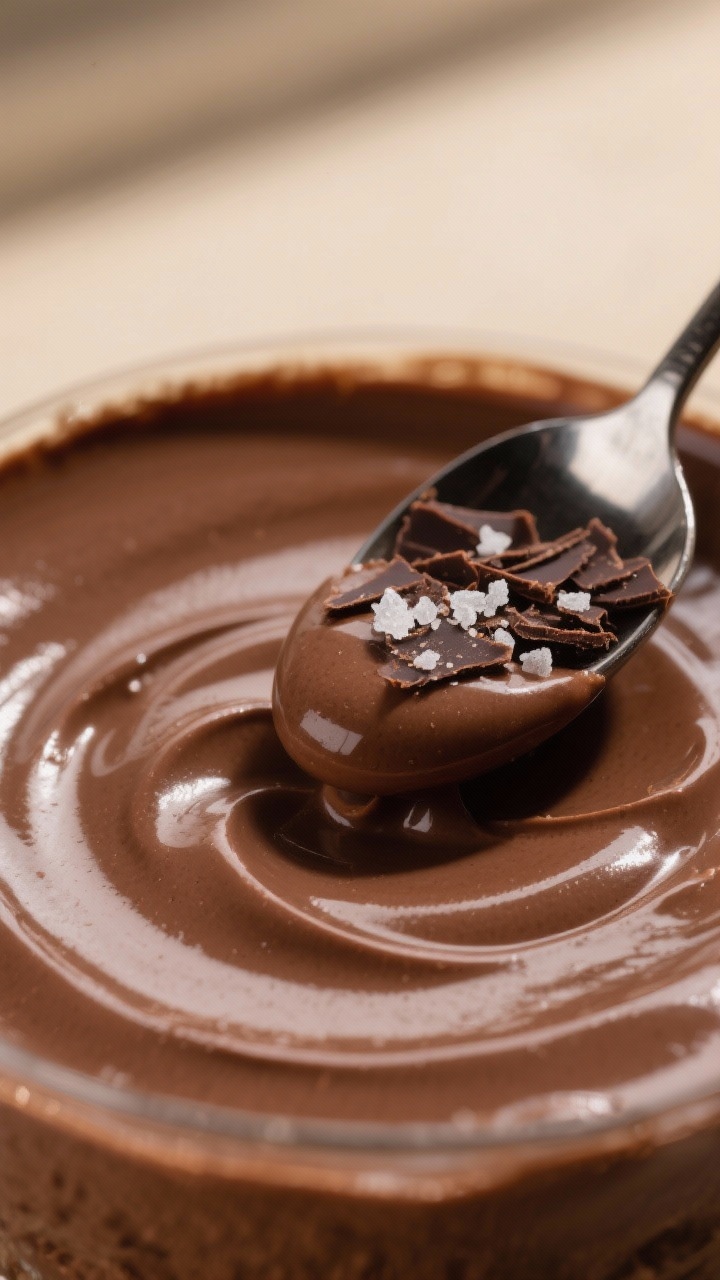
Chocolate Dessert Recipe – Simple, Rich, and Satisfying

If you’ve been craving something chocolatey and comforting, this dessert will do the trick without much hassle. It’s creamy, rich, and tastes like something you’d get at a restaurant, but it’s easy enough for a weeknight. You need just a handful of ingredients and one bowl on the stovetop.
It sets in the fridge, so you can make it ahead and relax. Serve it plain, with fresh berries, or a dollop of whipped cream, and you’re set.
Ingredients
Method
- Prep your ingredients: Chop the chocolate into small pieces so it melts quickly. Measure out everything else. Have a medium saucepan and a whisk ready.
- Mix dry ingredients: In the saucepan (off heat), whisk together the sugar, cocoa powder, cornstarch, and a pinch of salt until there are no lumps. This keeps the mixture smooth later.
- Add the dairy: Slowly whisk in the milk, a little at a time, to create a lump-free mixture. Add the heavy cream and whisk again until fully combined.
- Cook over medium heat: Place the pan over medium heat and whisk continuously. As it warms, the mixture will start to thicken. Don’t rush it. Keep whisking to prevent sticking and clumps.
- Simmer briefly: When it begins to bubble and thickly coat the back of a spoon, reduce the heat to low and cook for 1 to 2 minutes more, whisking the whole time. It should be silky and pudding-like.
- Stir in chocolate and butter: Remove from heat. Add the chopped chocolate and butter. Let it sit for 30 seconds, then whisk until completely melted and smooth.
- Add vanilla: Stir in the vanilla extract. Taste and adjust sweetness if needed, adding a little more sugar while the mixture is still warm and whisking until dissolved.
- Strain for extra smoothness (optional): For a flawless texture, pour the mixture through a fine-mesh sieve into a bowl or pitcher.
- Portion and chill: Divide into small ramekins, glasses, or a shallow dish. Press plastic wrap directly onto the surface to prevent a skin from forming. Chill for at least 2 hours, or until set.
- Serve and garnish: Remove the plastic wrap. Top with whipped cream, berries, shaved chocolate, or a pinch of flaky salt. Serve cold.
What Makes This Recipe So Good

- Deep, chocolate-forward flavor: Using both cocoa and real chocolate gives it a smooth, intense taste.
- Simple method: No baking, no eggs, and no complicated steps. Just whisk, heat, and chill.
- Uses pantry staples: Most of the ingredients are likely already in your kitchen.
- Flexible and forgiving: You can swap milk types, adjust sweetness, or add flavors like coffee or orange.
- Great make-ahead dessert: Sets in the fridge and tastes even better the next day.
Shopping List
- Whole milk (2 cups)
- Heavy cream (1 cup)
- Semi-sweet or dark chocolate, chopped (6 ounces)
- Unsweetened cocoa powder (3 tablespoons)
- Granulated sugar (1/3 cup to 1/2 cup, to taste)
- Cornstarch (3 tablespoons)
- Unsalted butter (2 tablespoons)
- Vanilla extract (1 teaspoon)
- Fine sea salt (a pinch)
- Optional toppings: whipped cream, fresh berries, shaved chocolate, or flaky salt
Step-by-Step Instructions

- Prep your ingredients: Chop the chocolate into small pieces so it melts quickly.
Measure out everything else. Have a medium saucepan and a whisk ready.
- Mix dry ingredients: In the saucepan (off heat), whisk together the sugar, cocoa powder, cornstarch, and a pinch of salt until there are no lumps. This keeps the mixture smooth later.
- Add the dairy: Slowly whisk in the milk, a little at a time, to create a lump-free mixture.
Add the heavy cream and whisk again until fully combined.
- Cook over medium heat: Place the pan over medium heat and whisk continuously. As it warms, the mixture will start to thicken. Don’t rush it.
Keep whisking to prevent sticking and clumps.
- Simmer briefly: When it begins to bubble and thickly coat the back of a spoon, reduce the heat to low and cook for 1 to 2 minutes more, whisking the whole time. It should be silky and pudding-like.
- Stir in chocolate and butter: Remove from heat. Add the chopped chocolate and butter.
Let it sit for 30 seconds, then whisk until completely melted and smooth.
- Add vanilla: Stir in the vanilla extract. Taste and adjust sweetness if needed, adding a little more sugar while the mixture is still warm and whisking until dissolved.
- Strain for extra smoothness (optional): For a flawless texture, pour the mixture through a fine-mesh sieve into a bowl or pitcher.
- Portion and chill: Divide into small ramekins, glasses, or a shallow dish. Press plastic wrap directly onto the surface to prevent a skin from forming.
Chill for at least 2 hours, or until set.
- Serve and garnish: Remove the plastic wrap. Top with whipped cream, berries, shaved chocolate, or a pinch of flaky salt. Serve cold.
How to Store
- Refrigerator: Cover tightly and store for up to 4 days.
Keep the plastic wrap touching the surface to prevent a skin.
- Make-ahead: This dessert actually improves after a night in the fridge. The chocolate flavor deepens.
- Freezer: Freezing isn’t ideal for the texture. If you do freeze, thaw slowly in the fridge.
Expect it to be slightly less smooth.
Why This is Good for You
- Cocoa benefits: Cocoa contains flavanols, which support circulation and may offer antioxidant effects.
- Customizable sweetness: You control the sugar, so you can keep it balanced and not overly sweet.
- Portion-friendly: Serving in small ramekins makes it easy to enjoy a satisfying amount without overdoing it.
- Dark chocolate option: Using darker chocolate raises the cocoa content and reduces added sugar per serving.
Common Mistakes to Avoid
- Overheating the mixture: High heat can cause scorching or a grainy texture. Keep the heat moderate and whisk constantly.
- Skipping the dry whisk: Not combining sugar, cocoa, and cornstarch first can lead to lumps. Mix them thoroughly before adding milk.
- Not cooking long enough: Cornstarch needs to come to a gentle simmer to activate.
If it’s not hot enough, the dessert won’t set properly.
- Using large chocolate chunks: Big pieces don’t melt evenly. Chop the chocolate finely for a smooth finish.
- Forgetting the plastic wrap: If you skip covering the surface, a skin will form and affect the texture.
Recipe Variations
- Mocha Chocolate: Add 1 to 2 teaspoons of instant espresso powder with the dry ingredients. Coffee deepens the chocolate flavor.
- Orange Chocolate: Stir in 1 teaspoon of orange zest and a splash of orange extract.
Garnish with candied peel.
- Spiced Mexican Chocolate: Add 1/4 teaspoon cinnamon and a pinch of cayenne. Top with a dusting of cocoa.
- Salted Caramel Swirl: Spoon ribbons of store-bought caramel into the ramekins before chilling. Finish with flaky salt.
- Dairy-Free: Use full-fat coconut milk in place of milk and cream, and swap the butter for coconut oil.
Choose dairy-free chocolate.
- Extra Dark: Use 70% to 85% chocolate and reduce the sugar slightly for a bold, bittersweet dessert.
- Nutty Crunch: Fold in chopped toasted hazelnuts or almonds just before portioning. Add a nut topping for texture.
FAQ
Can I use milk chocolate instead of dark or semi-sweet?
Yes, but reduce the sugar by a tablespoon or two since milk chocolate is sweeter. The result will be milder and creamier.
What if I don’t have cornstarch?
You can use the same amount of arrowroot starch.
Avoid flour here—it needs more cooking time and can taste pasty.
How do I fix a lumpy texture?
Whisk vigorously while heating, and strain the mixture before chilling. A fine-mesh sieve smooths everything out.
Can I make this without butter?
Yes. The butter adds shine and richness, but you can skip it.
If you want a similar finish, add a teaspoon of neutral oil.
How long does it take to set?
About 2 to 3 hours in the fridge. For the cleanest scoops or slices, chill at least 4 hours or overnight.
What kind of chocolate works best?
Good-quality bars melt more smoothly than chips. Semi-sweet or dark chocolate in the 55% to 70% range is a safe bet for balanced flavor.
Can I double the recipe?
Absolutely.
Use a larger saucepan and whisk constantly. The cooking time may be slightly longer, but the method is the same.
How can I make it lighter?
Use 2% milk and skip the butter. The texture will be a bit less rich but still smooth and satisfying.
Wrapping Up
This chocolate dessert recipe is simple, reliable, and delivers a silky, rich payoff every time.
The ingredients are easy to find, the steps are straightforward, and the flavor is pure chocolate comfort. Make it ahead, chill it well, and dress it up with whatever toppings you like. Keep this one in your back pocket for busy nights, dinner parties, or any time a chocolate fix calls your name.

Printable Recipe Card
Want just the essential recipe details without scrolling through the article? Get our printable recipe card with just the ingredients and instructions.